
Featured Member Video
How to make fire using HanddrillMore Videos by MountanWolf
View larger or ask the author a question.
View all wilderness survival videos
Recent Forum Posts 
Come Join the Discussion Today!
Our site has been mentioned in:
U.S. News and World Report
Best of the Web - Site of the Week 8/6/01
Discovery Channel Canada
One Week in the Wilderness
USA Today
Hot Sites 08/08/2005
How to Lay a Tar Paper, Birch Bark, or Patent Roofing
Preparing the Roofing for Laying
Birch bark and patent roofing are more pliable than tin or shingles, consequently taking less time to lay and making it easier work. In very cold weather put your patent roofing in a warm room a few hours before using it. Never try to cut birch bark, tar paper, or patent roofing with a dull knife.
Roofing Foundation
No matter what sort of roofing material is used, do not forget the great importance of the roofing foundation (Figs. 296 and 298). If the foundation is poor or uneven the roofing will be poor and uneven, even if only the best roofing material is used. The sheathing boards should be matched if possible and of uniform thickness, laid close, and free from nails, protruding knots, and sharp edges. Do not use green lumber; the sun is almost certain to shrink and warp it. Sometimes it will even break the roofing material. On very particular work, where the rafters are wide apart, the best builders recommend laying a course of boards over the planking at right angles to it.
Valleys
If there are valleys in the roof (Fig. 298) use a long strip of roofing and lay it up and down in the direction of the valleys. Press the strip into the hollow so that it takes the shape of the valley itself. Allow the edges of the roofing to overlap the strip in the valley an equal distance on both sides of the valley (Fig. 298).
How to Lay the Roofing
Begin at the eaves to lay the roofing (Fig. 299). Always lay the roll of patent roofing with the inside surface to the weather and in the same direction that the boards run—not at right angles to them. Begin nailing at the centre of the edges of the strips and work both ways to the ends—never the reverse, as the roofing may become wrinkled, twisted, or crooked. Always set caps even with the edge of the laps about two inches apart between their centres.
Gutters
To finish gutters, fasten and carefully cement with the pitch or tar or prepared composition the edge of the strip about half-way to the gutter. Bring the other edge onto the roof, then lay the next strip over this strip so that it will overlap at least two inches. Proceed to lay the balance of the roofing in the same way. Never nail the middle of the strips; nail only along the edges. The end strips should always be lapped over the edges of the roof and fastened (Figs. 297 and 299).
Before fastening laps paint a two-inch strip with the tar or pitch cement which comes with all patent roofing in order to stick it to the lower strip of roofing and to make a tight joint when put in place.
Do not drive nails carelessly or with too much force and be sure the cap fits snugly against the roofing. If nails go into holes or open cracks, do not remove them but thoroughly cement around them. Allow six inches for overlaps for joints where one strip joins another (Fig. 299, B). Be sure that two strips of roofing never meet at the ridge leaving a joint to invite a leak over the ridge-pole. Examine the diagrams if you fail to understand the description.
How to Patch a Shingle Roof
The reader must not suppose that the roof of my camp was made of flannel because it shrank, for the whole house, which was made of logs, diminished in size as the wood became seasoned; so that now each log averages a quarter of an inch less in width than it did when the house was built twenty odd years ago. There are just one hundred logs in the house, which makes the house twenty-five inches smaller than it was when it was built, but I cannot point out the exact spot where the two feet and one inch are missing. Neither do I know that this had anything to do with the opening in the roof about the chimney; but I do know that the opening gradually became wider and wider until it not only admitted the entrance of numerous flying squirrels and other varmints but also let in the rain and snow and consequently it had to be remedied. Neither the flying squirrels nor the elements can now enter at that point.
The Connecticut Yankees stop the leaks around the big chimneys of the old farmhouses with mortar or concrete, but at permanent camps cement is not always handy, and even if one is living in a farmhouse it will probably necessitate quite a long drive to procure it. If, however, there happens to be on hand some strips of the various tar roofing compounds, some old tin, or even a good piece of oilcloth—by which I mean a piece that may be so worn as to have been cast aside and yet not so perforated with holes that it will admit the rain—it may be used to stop the leak.
Fig. 291. Fig. 292. Fig. 293. Fig. 294. Fig. 296. Fig. 297. Fig. 298. Fig. 299.
 How to lay a composition roof and how to cover space around flue. (Fig. 295 is on next plate.)
Fixtures for Applying Roofing
The complete roofing kit consists of cement, caps, and nails. The galvanized caps and nails are the best to use; they won't rust. Square caps have more binding surface than the ordinary round ones; but we can mend "with any old thing."
Fig. 291 shows a chimney from which the roof of the house is parted, leaving a good-sized opening around the smoke-stack. To cover this, take a piece of roofing compound, tin, oilcloth, tar paper, or paroid and cut as is shown in the upper diagram (Fig. 292). Make the slits in the two ends of the material of such a length that when the upper ends are bent back, as in the lower diagram (Fig. 292), they will fit snugly around the chimney. You will need one piece like this for each side of the chimney. Where the ends of the chimney butt against the ridge of the roof you will require pieces slit in the same manner as the first but bent differently. The upper lobe in this case is bent on the bias to fit the chimney, while the lower one is bent over the ridge of the roof (Figs. 293 and 294).
To better illustrate how this is done, Fig. 293 is supposed to show the chimney with the roof removed. Fig. 294 is the same view of the chimney with the two pieces in place. You will need four pieces, two at each end of the chimney, to cover the ridge of the roof.
With all the many varieties of tar paper and composition roofing there come tacks or wire nails supplied with round tin disks perforated in the centre, which are used as washers to prevent the nail from pulling through the roofing.
Fig. 295 shows the chimney with the patches around it tacked in place, and the protruding ends of the parts trimmed off according to the dotted lines. Fig. 297 shows the way the roofing people put flashing on; but I like my own way, as illustrated by Figs. 291, 292, 293, 294, and 295. It must not be taken for granted that every camp or farmhouse has a supply of tin washers, but we know that every camp and farmhouse does have a supply of tin cans, and the washers may be made from these, as shown by Figs. 300 and 301. Knock the cans apart at their seams and cut the tin up into pieces like the rectangular one shown under the hand in Fig. 301. Bend these pieces in their centres so as to make them into squares, then place them on a piece of soft wood and punch holes in them by driving a wire nail through the tin and you will have better washers than those you can buy although they may not be so handsome.
Patched Roofs and New Shingles
Any decent shingled roof should last fifteen years without repairing and many of them last nearly twice that time. But there comes a time when the roof begins to leak and needs mending; when that time comes, with your jack-knife whittle a number of little wooden pegs or splints each about six inches long and a little thicker than a pipe-stem with which to
Mark the Holes
Go up in the attic and wherever you see daylight through the roof push through the hole a wooden peg to mark the spot. Then, when you have finished and are ready to climb on the roof, take off your shoes, put on a pair of woollen socks, and there will be little danger of your slipping. New india rubber shoes with corrugated soles are also good to wear when climbing on the roof.
In Fig. 295½ you will see two of the pegs sticking through the roof marking the holes, and below is a larger view of one of these pegs connected with the upper ones by dotted lines.
Sheet-Iron Shingles
To mend simple cracks or holes like these it is only necessary to bend up bits of tin or sheet iron (Fig. 300) and drive the metal shingle up underneath the shingle above the hole so that the "weather" part of the tin covers the leak, or drive it under the leaking shingle itself, or drive a new shingle up under or over the damaged one. Where there is a bad place in the roof it may be necessary to make a patch of a number of shingles like the one shown in the right-hand corner of Fig. 295½, but even then it is not necessary to remove the old shingles unless the hole is very large.
These patches of old tin or new shingles do not look handsome on an old roof, but they serve their purpose in keeping out the rain and snow and preventing moisture from rotting the timbers. The weather will soon tone down the color of the new shingles so that they will not be noticeable and you will have the satisfaction of having a dry roof over your head. There is only one thing worse than a leaky roof and that is a leaky boat.
Practical Patching
In these days when everybody with a few hundred dollars in pocket is very sensibly using it to buy a farm and farmhouse so as to be able for a part of the year to return to the simple life of our ancestors it is very necessary that we should also know something of the simple economies of those days, for when one finds oneself out on a farm there is no plumber around the corner and no tinsmith on the next block whom one may call upon to repair breaks and the damage done by time and weather on an old farmhouse. The ordinary man under these conditions is helpless, but some are inspired by novel ideas, as, for instance, the man who mended the leaking roof with porous plasters.
Fig. 295. Fig. 295.½. Fig. 300. Fig. 301. Fig. 302. Fig. 303. Fig. 304.
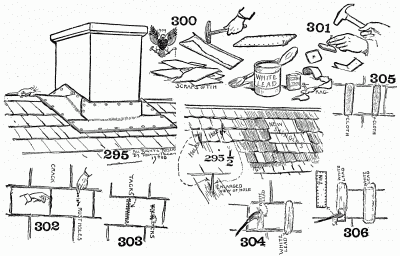 How to mend a shingle or tin roof.
But for the benefit of those who are not supplied with a stock of porous plasters I will tell how to do the plumbing and how to mend the tin roof with old bits of tin, rags, and white lead; and to begin with I want to impress upon the reader's mind that this will be no bungling, unsightly piece of work, but much more durable and just as neat as any piece of work which the professionals would do for him. In the first place, if you have an old tin roof on one of the extensions of your house or on your house itself, do not be in haste to replace it with a new one. Remember that most of the modern sheet tin is made by modern methods and its life is not an extended one. The sheet steel they often use in place of sheet iron rapidly disintegrates and such a roof will not last you half the time that a properly patched old one will.
The roof of the house in which I am writing this article is made of tin and was made about sixty years ago; it has been patched and mended but to no great extent, and it bids fair to outlive me. Had it been made of sheet steel it would have been necessary to renew it many times since that period. So, if you find that the tin roof to your farmhouse, bungalow, or camp leaks in consequence of some splits at the seams and a few rust holes patch them yourself. Fig. 301 shows the only material necessary for that purpose. You do not even need a pair of shears to cut your tin, for it is much better folded over and hammered into shape, as shown by Fig. 301. Fig. 302 shows a crack and some rust holes in the tin roof. Take your carpet-tacks and hammer and neatly tack down the edges of the opening, as shown by Fig. 303. If there is any difficulty in driving tacks through the tin roof, use a small wire nail and hammer to first punch the holes. Put the tacks close together. With your paint-brush thickly coat the mended parts with white lead, as shown by Fig. 304. Cut a strip of a rag to fit over the holes and tack it at its four corners, as shown by Fig. 305. Now, then, cover the rag with a thick coat (Fig. 306) of the white lead. Next tack the tin over the wounded spots, putting the tacks close together, as shown by Fig. 306. Afterward coat the tin with a covering of white lead and the patchwork is done. The roof will not leak again at those spots in the next twenty years. This will leave white, unsightly blotches on the roof, but after the white lead is dry a few dabs with the red roof paint will make the white patches the same color as the surrounding tin and effectually conceal them.
Do not forget the importance of carefully going over your roof after it is mended and make sure that every joint is properly covered, tacked, and thoroughly coated with white lead. Cover all joints, nails, and caps with a coat of white lead. Water will not run through the tin roofing, but it will find its way through nail holes, rust holes, and open seams if they are not made absolutely tight.
Plumbing
After I had finished doctoring up the kitchen roof of my farmhouse, I discovered that the drain-pipe from the kitchen sink had a nasty leak where the pipe ran through the cellar. Of course, there was no plumber handy—plumbers do not live in farming districts—so it was "up to" me and my helper to stop the leak as best we could. A few blows on the lead with the hammer, carefully administered, almost closed the hole. I then had recourse to the white lead which I had been using on the kitchen roof, and I daubed the pipe with paint; still the water oozed through; but after I had applied a strip of linen to the leak and then neatly wrapped it round and painted the whole of it with white lead the leak was effectually stopped, and the pipe is apparently as good now, six years after the mending, as it was when it was new.
In this sort of work it must be remembered that it is the white lead we depend upon, and the other material which we use—the tin and the rags—are only for the purpose of protecting and holding the white lead in place. Of course, a roof may be mended with tar, but that is always unsightly and insists upon running when heated by a hot sun; besides, it is most difficult to conceal and does not come ready for use like white lead.
If the leak happens to be around the chimney it can be mended by bending pieces of tin up against the chimney according to the diagram shown for the tar paper and patent roofings (Figs. 295 and 297).
Flashings, Chimneys, Walls, Etc.
Lead or copper is best for flashings, but in case metal is not convenient you will find that various patent roofing materials are good substitutes. Run the strips of roofing to the angle formed by the object to be flashed and extend the same up the object three or four inches. Fasten these strips to the roof in the usual way or by nailing cleats of wood over the top edges.
Leaks in tubs, barrels, and tanks used about the farm can be mended with rags, tin, and white lead in the manner described for the roof and pipe. Also leaks in the leaders running from the roof may be treated in the same manner, but if you must get new leaders for your house by no means replace the old ones with galvanized-steel tubes. You can tell the difference between galvanized steel and galvanized iron by its appearance. The steel is brighter and more silvery than the iron, but my experience is that the steel will last only two or three years; sometimes one season puts steel pipes out of commission, whereas galvanized iron will last indefinitely. After having three sets of galvanized-steel leaders on my town house, I had them replaced with copper leaders; for, although the expense is greater, I have found it more economical in the end. For people having plenty of money to spend on their country houses I would advise the use of copper leaders, but folks of limited means will save money patching up the old tin ones or old galvanized ones instead of replacing them with galvanized steel, which is of little service for outdoor wear. There are, I believe, only a few firms who now manufacture galvanized iron, but your architect can find them if you insist upon it.
Back to Shelters, Shacks, and ShantiesUltimate Survival Knife & Kit |
List Price: 61.99 Our Price: 39.95 |
This 15 inch survival knife with drop point blade features a thick quality stainless steel blade with serrated top edge. Textured and ribbed solid metal handle and guard. Nylon sheath. Survival kit includes a hollow grip with a compass top to store items within the knife itself, as well as additional pouches on the sheath to hold the rest. Complete survival kit. Click Here to Buy the Survival Knife Now. |
|
