Mountain Hazards
Hazards can be termed natural (caused by natural occurrence), man-made (caused by an individual, such as lack of preparation, carelessness, improper diet, equipment misuse), or as a combination (human trigger). There are two kinds of hazards while in the mountains�subjective and objective. Combinations of objective and subjective hazards are referred to as cumulative hazards.
Subjective Hazards
Subjective hazards are created by humans; for example, choice of route, companions, overexertion, dehydration, climbing above one�s ability, and poor judgment.
a. Falling. Falling can be caused by carelessness, over-fatigue, heavy equipment, bad weather, overestimating ability, a hold breaking away, or other reasons.
b. Bivouac Site. Bivouac sites must be protected from rockfall, wind, lightning, avalanche run-out zones, and flooding (especially in gullies). If the possibility of falling exists, rope in, the tent and all equipment may have to be tied down.
c. Equipment. Ropes are not total security; they can be cut on a sharp edge or break due to poor maintenance, age, or excessive use. You should always pack emergency and bivouac equipment even if the weather situation, tour, or a short climb is seemingly low of dangers.
Objective Hazards
Objective hazards are caused by the mountain and weather and cannot be influenced by man; for example, storms, rockfalls, icefalls, lightning, and so on.
a. Altitude. At high altitudes (especially over 6,500 feet), endurance and concentration is reduced. Cut down on smoking and alcohol. Sleep well, acclimatize slowly, stay hydrated, and be aware of signs and symptoms of high-altitude illnesses. Storms can form quickly and lightning can be severe.
b. Visibility. Fog, rain, darkness, and or blowing snow can lead to disorientation. Take note of your exact position and plan your route to safety before visibility decreases. Cold combined with fog can cause a thin sheet of ice to form on rocks (verglas). Whiteout conditions can be extremely dangerous. If you must move under these conditions, it is best to rope up. Have the point man move to the end of the rope. The second man will use the first man as an aiming point with the compass. Use a route sketch and march table. If the tactical situation does not require it, plan route so as not to get caught by darkness.
c. Gullies. Rock, snow, and debris are channeled down gullies. If ice is in the gully, climbing at night may be better because the warming of the sun will loosen stones and cause rockfalls.
d. Rockfall. Blocks and scree at the base of a climb can indicate recurring rockfall. Light colored spots on the wall may indicate impact chips of falling rock. Spring melt or warming by the sun of the rock/ice/snow causes rockfall.
e. Avalanches. Avalanches are caused by the weight of the snow overloading the slope. (Refer to paragraph 1-25 for more detailed information on avalanches.)
f. Hanging Glaciers and Seracs. Avoid, if at all possible, hanging glaciers and seracs. They will fall without warning regardless of the time of day or time of year. One cubic meter of glacier ice weighs 910 kilograms (about 2,000 pounds). If you must cross these danger areas, do so quickly and keep an interval between each person.
g. Crevasses. Crevasses are formed when a glacier flows over a slope and makes a bend, or when a glacier separates from the rock walls that enclose it. A slope of only two to three degrees is enough to form a crevasse. As this slope increases from 25 to 30 degrees, hazardous icefalls can be formed. Likewise, as a glacier makes a bend, it is likely that crevasses will form at the outside of the bend. Therefore, the safest route on a glacier would be to the inside of bends, and away from steep slopes and icefalls. Extreme care must be taken when moving off of or onto the glacier because of the moat that is most likely to be present.
Weather Hazards
Weather conditions in the mountains may vary from one location to another as little as 10 kilometers apart. Approaching storms may be hard to spot if masked by local peaks. A clear, sunny day in July could turn into a snowstorm in less than an hour. Always pack some sort of emergency gear.
a. Winds are stronger and more variable in the mountains; as wind doubles in speed, the force quadruples.
b. Precipitation occurs more on the windward side than the leeward side of ranges. This causes more frequent and denser fog on the windward slope.
c. Above approximately 8,000 feet, snow can be expected any time of year in the temperate climates.
d. Air is dryer at higher altitudes, so equipment does not rust as quickly, but dehydration is of greater concern.
e. Lightning is frequent, violent, and normally attracted to high points and prominent features in mountain storms. Signs indicative of thunderstorms are tingling of the skin, hair standing on end, humming of metal objects, crackling, and a bluish light (St. Elmo�s fire) on especially prominent metal objects (summit crosses and radio towers).
(1) Avoid peaks, ridges, rock walls, isolated trees, fixed wire installations, cracks that guide water, cracks filled with earth, shallow depressions, shallow overhangs, and rock needles. Seek shelter around dry, clean rock without cracks; in scree fields; or in deep indentations (depressions, caves). Keep at least half a body�s length away from a cave wall and opening.
(2) Assume a one-point-of-contact body position. Squat on your haunches or sit on a rucksack or rope. Pull your knees to your chest and keep both feet together. If half way up the rock face, secure yourself with more than one point�lightning can burn through rope. If already rappelling, touch the wall with both feet together and hurry to the next anchor.
f. During and after rain, expect slippery rock and terrain in general and adjust movement accordingly. Expect flash floods in gullies or chimneys. A climber can be washed away or even drowned if caught in a gully during a rainstorm. Be especially alert for falling objects that the rain has loosened.
g. Dangers from impending high winds include frostbite (from increased wind-chill factor), windburn, being blown about (especially while rappelling), and debris being blown about. Wear protective clothing and plan the route to be finished before bad weather arrives.
h. For each 100-meter rise in altitude, the temperature drops approximately one degree Fahrenheit. This can cause hypothermia and frostbite even in summer, especially when combined with wind, rain, and snow. Always wear or pack appropriate clothing.
i. If it is snowing, gullies may contain avalanches or snow sloughs, which may bury the trail. Snowshoes or skis may be needed in autumn or even late spring. Unexpected snowstorms may occur in the summer with accumulations of 12 to 18 inches; however, the snow quickly melts.
j. Higher altitudes provide less filtering effects, which leads to greater ultraviolet (UV) radiation intensity. Cool winds at higher altitudes may mislead one into underestimating the sun�s intensity, which can lead to sunburns and other heat injuries. Use sunscreen and wear hat and sunglasses, even if overcast. Drink plenty of fluids.
Avalanche Issues
Avalanches occur when the weight of accumulated snow on a slope exceeds the cohesive forces that hold the snow in place. (Table 1-2 shows an avalanche hazard evaluation checklist.)
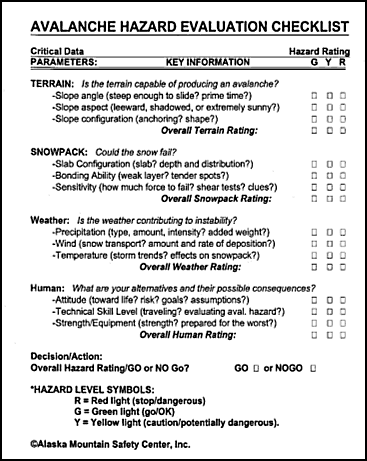
Table 1-2. Avalance hazard evaluation checklist.
a. Slope Stability. Slope stability is the key factor in determining the avalanche danger.
(1) Slope Angle. Slopes as gentle as 15 degrees have avalanched. Most avalanches occur on slopes between 30 and 45 degrees. Slopes above 60 degrees often do not build up significant quantities of snow because they are too steep.
(2) Slope Profile. Dangerous slab avalanches are more likely to occur on convex slopes, but may occur on concave slopes.
(3) Slope Aspect. Snow on north facing slopes is more likely to slide in midwinter. South facing slopes are most dangerous in the spring and on sunny, warm days. Slopes on the windward side are generally more stable than leeward slopes.
(4) Ground Cover. Rough terrain is more stable than smooth terrain. On grassy slopes or scree, the snow pack has little to anchor to.
b. Triggers. Various factors trigger avalanches.
(1) Temperature. When the temperature is extremely low, settlement and adhesion occur slowly. Avalanches that occur during extreme cold weather usually occur during or immediately following a storm. At a temperature just below freezing, the snowpack stabilizes quickly. At temperatures above freezing, especially if temperatures rise quickly, the potential for avalanche is high. Storms with a rise in temperature can deposit dry snow early, which bonds poorly with the heavier snow deposited later. Most avalanches occur during the warmer midday.
(2) Precipitation. About 90 percent of avalanches occur during or within twenty-four hours after a snowstorm. The rate at which snow falls is important. High rates of snowfall (2.5 centimeters per hour or greater), especially when accompanied by wind, are usually responsible for major periods of avalanche activity. Rain falling on snow will increase its weight and weakens the snowpack.
(3) Wind. Sustained winds of 15 miles per hour and over transport snow and form wind slabs on the lee side of slopes.
(4) Weight. Most victims trigger the avalanches that kill them.
(5) Vibration. Passing helicopters, heavy equipment, explosions, and earth tremors have triggered avalanches.
c. Snow Pits. Snow pits can be used to determine slope stability.
(1) Dig the snow pit on the suspect slope or a slope with the same sun and wind conditions. Snow deposits may vary greatly within a few meters due to wind and sun variations. (On at least one occasion, a snow pit dug across the fall line triggered the suspect slope). Dig a 2-meter by 2-meter pit across the fall line, through all the snow, to the ground. Once the pit is complete, smooth the face with a shovel.
(2) Conduct a shovel shear test.
(a) A shovel shear test puts pressure on a representative sample of the snowpack. The core of this test is to isolate a column of the snowpack from three sides. The column should be of similar size to the blade of the shovel. Dig out the sides of the column without pressing against the column with the shovel (this affects the strength). To isolate the rear of the column, use a rope or string to saw from side to side to the base of the column.
(b) If the column remained standing while cutting the rear, place the shovel face down on the top of the column. Tap with varying degrees of strength on the shovel to see what force it takes to create movement on the bed of the column. The surface that eventually slides will be the layer to look at closer. This test provides a better understanding of the snowpack strength. For greater results you will need to do this test in many areas and formulate a scale for the varying methods of tapping the shovel.
(3) Conduct a Rutschblock test. To conduct the test, isolate a column slightly longer than the length of your snowshoes or skis (same method as for the shovel shear test). One person moves on their skis or snowshoes above the block without disturbing the block. Once above, the person carefully places one showshoe or ski onto the block with no body weight for the first stage of the test. The next stage is adding weight to the first leg. Next, place the other foot on the block. If the block is still holding up, squat once, then twice, and so on. The remaining stage is to jump up and land on the block.
d. Types of Snow Avalanches. There are two types of snow avalanches: loose snow (point) and slab.
(1) Loose snow avalanches start at one point on the snow cover and grow in the shape of an inverted "V." Although they happen most frequently during the winter snow season, they can occur at any time of the year in the mountains. They often fall as many small sluffs during or shortly after a storm. This process removes snow from steep upper slopes and either stabilizes lower slopes or loads them with additional snow.
(2) Wet loose snow avalanches occur in spring and summer in all mountain ranges. Large avalanches of this type, lubricated and weighed down by meltwater or rain can travel long distances and have tremendous destructive power. Coastal ranges that have high temperatures and frequent rain are the most common areas for this type of avalanche.
(3) Slab avalanches occur when cohesive snow begins to slide on a weak layer. The fracture line where the moving snow breaks away from the snowpack makes this type of avalanche easy to identify. Slab release is rapid. Although any avalanche can kill you, slab avalanches are generally considered more dangerous than loose snow avalanches.
(a) Most slab avalanches occur during or shortly after a storm when slopes are loaded with new snow at a critical rate. The old rule of never travel in avalanche terrain for a few days after a storm still holds true.
(b) As slabs become harder, their behavior becomes more unpredictable; they may allow several people to ski across before releasing. Many experts believe they are susceptible to rapid temperature changes. Packed snow expands and contracts with temperature changes. For normal density, settled snow, a drop in temperature of 10 degrees Celsius (18 degrees Fahrenheit) would cause a snow slope 300 meters wide to contract 2 centimeters. Early ski mountaineers in the Alps noticed that avalanches sometimes occurred when shadows struck a previously sun-warmed slope.
d. Protective Measures. Avoiding known or suspected avalanche areas is the easiest method of protection. Other measures include:
(1) Personal Safety. Remove your hands from ski pole wrist straps. Detach ski runaway cords. Prepare to discard equipment. Put your hood on. Close up your clothing to prepare for hypothermia. Deploy avalanche cord. Make avalanche probes and shovels accessible. Keep your pack on at all times�do not discard. Your pack can act as a flotation device, as well as protect your spine.
(2) Group Safety. Send one person across the suspect slope at a time with the rest of the group watching. All members of the group should move in the same track from safe zone to safe zone.
e. Route Selection. Selecting the correct route will help avoid avalanche prone areas, which is always the best choice. Always allow a wide margin of safety when making your decision.
(1) The safest routes are on ridge tops, slightly on the windward side; the next safest route is out in the valley, far from the bottom of slopes.
(2) Avoid cornices from above or below. Should you encounter a dangerous slope, either climb to the top of the slope or descend to the bottom�well out of the way of the run-out zone. If you must traverse, pick a line where you can traverse downhill as quickly as possible. When you must ascend a dangerous slope, climb to the side of the avalanche path, and not directly up the center.
(3) Take advantage of dense timber, ridges, or rocky outcrops as islands of safety. Use them for lunch and rest stops. Spend as little time as possible on open slopes.
(4) Since most avalanches occur within twenty-four hours of a storm and or at midday, avoid moving during these periods. Moving at night is tactically sound and may be safer.
f. Stability Analysis. Look for nature�s billboards on slopes similar to the one you are on.
(1) Evidence of Avalanching. Look for recent avalanches and for signs of wind-loading and wind-slabs.
(2) Fracture Lines. Avoid any slopes showing cracks.
(3) Sounds. Beware of hollow sounds�a "whumping" noise. They may suggest a radical settling of the snowpack.
g. Survival. People trigger avalanches that bury people. If these people recognized the hazard and chose a different route, they would avoid the avalanche. The following steps should be followed if caught in an avalanche.
(1) Discard equipment. Equipment can injure or burden you; discarded equipment will indicate your position to rescuers.
(2) Swim or roll to stay on tope of the snow. FIGHT FOR YOUR LIFE. Work toward the edge of the avalanche. If you feel your feet touch the ground, give a hard push and try to "pop out" onto the surface.
(3) If your head goes under the snow, shut your mouth, hold your breath, and position your hands and arms to form an air pocket in front of your face. Many avalanche victims suffocate by having their mouths and noses plugged with snow.
(4) When you sense the slowing of the avalanche, you must try your hardest to reach the surface. Several victims have been found quickly because a hand or foot was sticking above the surface.
(5) When the snow comes to rest it sets up like cement and even if you are only partially buried, it may be impossible to dig yourself out. Don�t shout unless you hear rescuers immediately above you; in snow, no one can hear you scream. Don�t struggle to free yourself�you will only waste energy and oxygen.
(6) Try to relax. If you feel yourself about to pass out, do not fight it. The respiration of an unconscious person is more shallow, their pulse rate declines, and the body temperature is lowered, all of which reduce the amount of oxygen needed. (See Appendix C for information on search and rescue techniques.)
Ultimate Survival Knife & Kit |
List Price: 61.99 Our Price: 39.95 |
This 15 inch survival knife with drop point blade features a thick quality stainless steel blade with serrated top edge. Textured and ribbed solid metal handle and guard. Nylon sheath. Survival kit includes a hollow grip with a compass top to store items within the knife itself, as well as additional pouches on the sheath to hold the rest. Complete survival kit. Click Here to Buy the Survival Knife Now. |
|
