
Featured Member Video
Tricked Out Maxpedition Condor IIMore Videos by IA Woodsman
View larger or ask the author a question.
View all wilderness survival videos
Recent Forum Posts 
Come Join the Discussion Today!
Our site has been mentioned in:
U.S. News and World Report
Best of the Web - Site of the Week 8/6/01
Discovery Channel Canada
One Week in the Wilderness
USA Today
Hot Sites 08/08/2005
Build a Barabara
The houses along the coast of the Bering Sea are called barabaras, but the ones that we are going to build now are in form almost identical with the Pawnee hogan (Figs. 42 and 43), the real difference being in the peculiar log work of the barabara in place of the teepee-like rafters of the said hogan.
To build a barabara you will need eight short posts for the outside wall and six or eight longer posts for the inside supports (Fig. 145). The outside posts should stand about three feet above the ground after they have been planted in the holes dug for the purpose. The top of the posts should be cut wedge-shaped, as shown by Fig. 144, in order to fit in the notch B (Fig. 144). The cross logs, where they cross each other, should be notched like those of a log cabin (Figs. 162 and 165) or flattened at the points of contact.
Plant your first four posts for the front of your barabara in a line, two posts for the corners B and E (Fig. 145 A), and two at the middle of the line C and D for door-jambs (plan, Fig. 145 A). The tops of these posts should be level with each other so that if a straight log is placed over them the log will lie level. Next plant the two side-posts F and G (Fig. 145 A) at equal distances from the two front posts and make them a few feet farther apart than are the front posts. The sketch of the framework is drawn in very steep perspective, that is, it is made as if the spectator was on a hill looking down upon it. It is drawn in this manner so as to better show the construction, but the location of the posts may be seen in the small plan. Next set the two back posts, H and K, and place them much closer together, so that the bottom frame when the rails are on the post will be very near the shape of a boy's hexagonal kite.
Fig. 144. Fig. 145. Fig. 146. Fig. 147. Fig. 148.
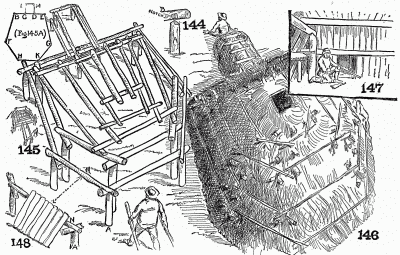 The details of a Barabara.
Inside erect another set of posts, setting each one opposite the outside ones and about a foot and a half or two feet farther in, or maybe less distance, according to the material one is using. Next set some posts for the hallway or entrance, which will be the door-jambs, and you are ready to build up the log roof. Do this by first setting the rail securely on the two side-posts on the right and left of the building; then secure the back plate on the two back posts at the rear of the building, next resting a long log over the side rails at the front of the building. The door-posts, of course, must be enough taller than the two end posts to allow for the thickness of the log, so that the front log will rest upon their top. Next put your two corner logs on, and your outside rail is complete. Build the inside rail in the same manner; then continue to build up with the logs as shown in the diagram until you have a frame like that in Fig. 145. Fig. 147 shows the inside of the house and the low doorway, and Fig. 148 shows the slanting walls. This frame is supposed to be covered with splits or shakes (Figs. 147 and 148), but, as in all pioneer structures, if shakes, splits, and clapboards are unobtainable, use the material at hand—birch bark, spruce bark, tar paper, old tin roofing, tent-cloth, or sticks, brush, ferns, weeds, or round sticks, to cover it as you did with the Pawnee hogan (Figs. 42 and 43). Then cover it with browse, or thatch it with hay or straw and hold the thatch in place with poles or sticks, as shown in Fig. 146. The barabara may also be covered with earth, sod, or mud.
This sort of a house, if built with planks or boards nailed securely to the rafters and covered with earth and sod, will make a splendid cave house for boys and a playhouse for children on the lawn, and it may be covered with green growing sod so as to have the appearance of an ornamental mound. The instinct of the cave-dweller is deeply implanted in the hearts of boys, and every year we have a list of fatal accidents caused by the little fellows digging caves in sand-banks or banks of gravel which frequently fall in and bury the little troglodytes, but they will be safe in a barabara. The shack is ventilated by a chimney hole in the roof as shown by Fig. 146. This hole should be protected in a playhouse. The framework is a good one to use in all parts of the country for more or less permanent camps, but the long entrance and low doorway are unnecessary except in a cold climate or to add to the mystery of the cave house for children. It is a good form for a dugout for a root house or cyclone cellar.
Back to Shelters, Shacks, and ShantiesUltimate Survival Knife & Kit |
List Price: 61.99 Our Price: 39.95 |
This 15 inch survival knife with drop point blade features a thick quality stainless steel blade with serrated top edge. Textured and ribbed solid metal handle and guard. Nylon sheath. Survival kit includes a hollow grip with a compass top to store items within the knife itself, as well as additional pouches on the sheath to hold the rest. Complete survival kit. Click Here to Buy the Survival Knife Now. |
|
